Quick Recap

Context APIs

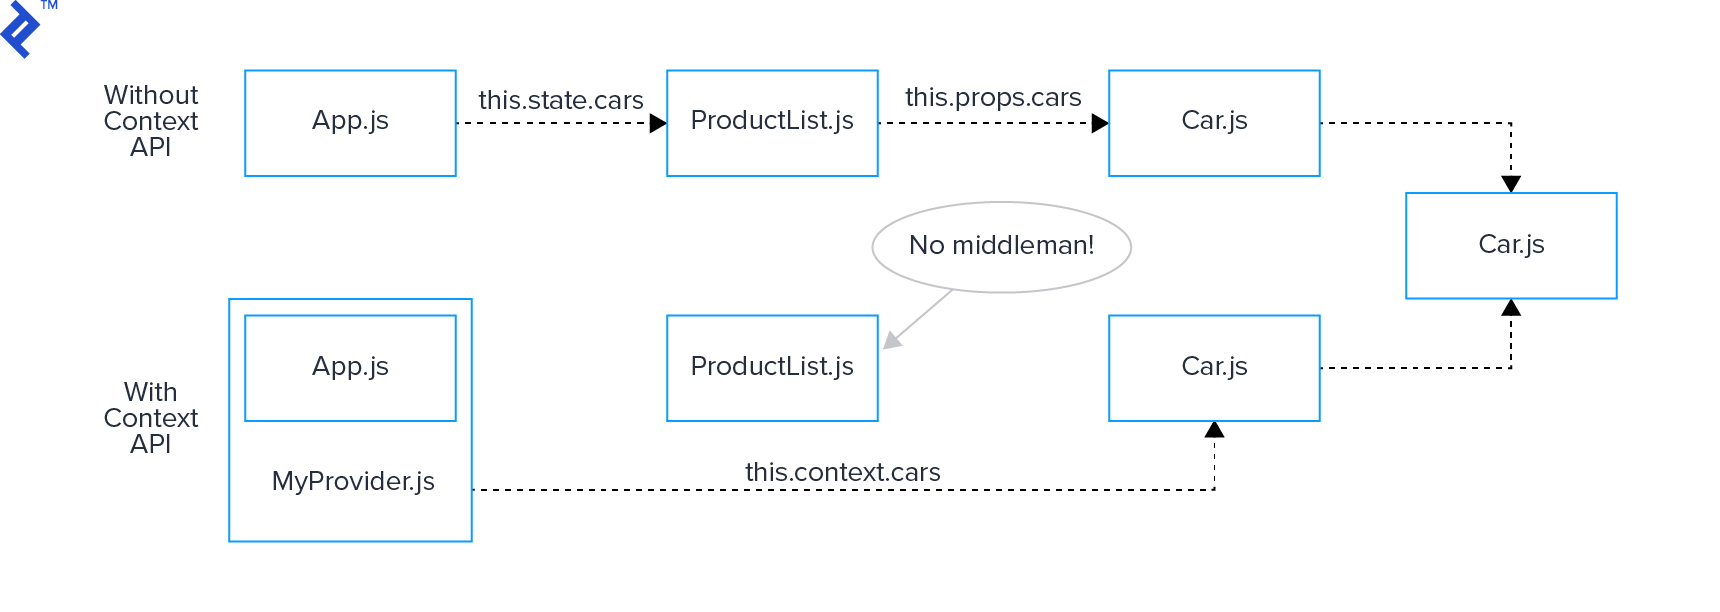
This new API solves one major problem–prop drilling. Even if you’re not familiar with the term, if you’ve worked on a React.js app, it has probably happened to you. Prop drilling is the processing of getting data from component A to component Z by passing it through multiple layers of intermediary React components. Component will receive props indirectly and you, the React Developer will have to ensure everything works out right.

Let’s explore how you would handle common problems without the React Context API

App.js

class App extends Component {
    state = {
        cars: {
            car001: { name: 'Honda', price: 100 },
            car002: { name: 'BMW', price: 150 },
            car003: { name: 'Mercedes', price: 200 }
        }
    };
    incrementCarPrice = this.incrementCarPrice.bind(this);
    decrementCarPrice = this.decrementCarPrice.bind(this);

    incrementCarPrice(selectedID) {
        // a simple method that manipulates the state
        const cars = Object.assign({}, this.state.cars);
        cars[selectedID].price = cars[selectedID].price + 1;
        this.setState({
            cars
        });
    }

    decrementCarPrice(selectedID) {
        // a simple method that manipulates the state
        const cars = Object.assign({}, this.state.cars);
        cars[selectedID].price = cars[selectedID].price - 1;
        this.setState({
            cars
        });
    }

    render() {
        return (
            <div className="App">
                <header className="App-header">
                    <img src={logo} className="App-logo" alt="logo" />
                    <h1 className="App-title">Welcome to my web store</h1>
                </header>
                {/* Pass props twice */}
                <ProductList
                    cars={this.state.cars}
                    incrementCarPrice={this.incrementCarPrice}
                    decrementCarPrice={this.decrementCarPrice}
                />
            </div>
        );
    }
}

ProductList .js

const ProductList = props => (
    <div className="product-list">
        <h2>Product list:</h2>
        {/* Pass props twice */}
        <Cars
            cars={props.cars}
            incrementCarPrice={props.incrementCarPrice}
            decrementCarPrice={props.decrementCarPrice}
        />
        {/* Other potential product categories which we will skip for this demo: */}
        {/* <Electronics /> */}
        {/* <Clothes /> */}
        {/* <Shoes /> */}
    </div>
);

export default ProductList;

Cars.js

const Cars = props => (
    <Fragment>
        <h4>Cars:</h4>
        {/* Finally we can use data */}
        {Object.keys(props.cars).map(carID => (
            <Car
                key={carID}
                name={props.cars[carID].name}
                price={props.cars[carID].price}
                incrementPrice={() => props.incrementCarPrice(carID)}
                decrementPrice={() => props.decrementCarPrice(carID)}
            />
        ))}
    </Fragment>
);

Car.js

const Cars = props => (
    <Fragment>
        <p>Name: {props.name}</p>
        <p>Price: ${props.price}</p>
        <button onClick={props.incrementPrice}>&uarr;</button>
        <button onClick={props.decrementPrice}>&darr;</button>
    </Fragment>
);

Granted, this isn’t the best way to handle your data, but I hope it demonstrates why prop drilling sucks. So how can the Context API help us avoid this?

Introducing the Context Web Store

Let’s refactor the app and demonstrate what it can do. In a few words, the Context API allows you to have a central store where your data lives (yes, just like in Redux). The store can be inserted into any component directly. You can cut out the middleman!

The refactoring is quite easy–we don’t have to make any changes to how the components are structured. We do need to create some new components, however–a provider and a consumer.

1. Initialize the Context

First, we need to create the context, which we can later use to create providers and consumers.

MyContext.js

import React from 'react';

// this is the equivalent to the createStore method of Redux
// https://redux.js.org/api/createstore

const MyContext = React.createContext();

export default MyContext;

2. Create the Provider

Once that’s done, we can import the context and use it to create our provider, which we’re calling MyProvider. In it, we initialize a state with some values, which you can share via value prop our provider component. In our example, we’re sharing this.state.cars along with a couple of methods that manipulate the state. Think of these methods as reducers in Redux.

MyProvider.js

import MyContext from './MyContext';

class MyProvider extends Component {
    state = {
        cars: {
            car001: { name: 'Honda', price: 100 },
            car002: { name: 'BMW', price: 150 },
            car003: { name: 'Mercedes', price: 200 }
        }
    };

    render() {
        return (
            <MyContext.Provider
                value={{
                    cars: this.state.cars,
                    incrementPrice: selectedID => {
                        const cars = Object.assign({}, this.state.cars);
                        cars[selectedID].price = cars[selectedID].price + 1;
                        this.setState({
                            cars
                        });
                    },
                    decrementPrice: selectedID => {
                        const cars = Object.assign({}, this.state.cars);
                        cars[selectedID].price = cars[selectedID].price - 1;
                        this.setState({
                            cars
                        });
                    }
                }}
            >
                {this.props.children}
            </MyContext.Provider>
        );
    }
}

To make the provider accessible to other components, we need to wrap our app with it (yes, just like in Redux). While we’re at it, we can get rid of the state and the methods because they are now defined in MyProvider.js.

App.js

class App extends Component {
    render() {
        return (
            <MyProvider>
                <div className="App">
                    <header className="App-header">
                        <img src={logo} className="App-logo" alt="logo" />
                        <h1 className="App-title">Welcome to my web store</h1>
                    </header>
                    <ProductList />
                </div>
            </MyProvider>
        );
    }
}

3. Create the Consumer

We’ll need to import the context again and wrap our component with it which injects the contextargument in the component. Afterward, it’s pretty straight forward. You use context, the same way you would use props. It holds all the values we’ve shared in MyProducer, we just need to use it!

Cars.js

const Cars = () => (
    <MyContext.Consumer>
        {context => (
            <Fragment>
                <h4>Cars:</h4>
                {Object.keys(context.cars).map(carID => (
                    <Car
                        key={carID}
                        name={context.cars[carID].name}
                        price={context.cars[carID].price}
                        incrementPrice={() => context.incrementPrice(carID)}
                        decrementPrice={() => context.decrementPrice(carID)}
                    />
                ))}
            </Fragment>
        )}
    </MyContext.Consumer>
);

What did we forget? The ProductList! This is where the benefit becomes apparent. We don’t pass any data or methods. The component is simplified because it only needs to render a few components.

ProductList.js

const ProductList = () => (
    <div className="product-list">
        <h2>Product list:</h2>
        <Cars />
        {/* Other potential product categories which we will skip for this demo: */}
        {/* <Electronics /> */}
        {/* <Clothes /> */}
        {/* <Shoes /> */}
    </div>
);

Over the course of this article, I made a few comparisons between Redux and the Context API. One of the biggest advantages of Redux is that fact that your app can have a central store which can be accessed from any component. With the new Context API, you have that functionality by default. A lot of hype has been made that the Context API will render Redux obsolete.

This might be true for those of you that only use Redux for its central store capabilities. If that’s the only feature you were using it for you can now replace it with the Context API and avoid prop drilling without using third-party libraries.

Last updated