Jest and Enjyme Testing
Unit Testing Framework
First of all, you need a unit testing framework. A unit testing framework defines how your tests should be structured, collects all tests in runtime and defines the way your tests are executed.
A testing framework is also able to generate an overview of the code coverage your tests achieved during a test run. Code coverage describes how many lines of code in a file or in total are covered by the executed tests. This gives you an indicator of whether you have written enough tests to cover your application. But beware, high code coverage does not imply you have developed a low-error application. Code coverage is only that relevant when you have written meaningful tests.
The structure of a test has become a kind of standardized:
This is the structure that the testing frameworks Jest, Mocha and Jasemine use as a guideline.
Mocha runs on Node.js and in the browser. Mocha performs asynchronous Testing in a simpler way. Provides accuracy and flexibility in reporting. Provides tremendous support of rich features such as test-specific timeouts, JavaScript APIs etc.
Jasmine: Jasmine is the behavior-driven development framework for JavaScript unit testing. It is used for testing both synchronous and asynchronous JavaScript Code. It does not require DOM and comes with the easy syntax that can be written for any test.
Jest: Jest is used by Facebook so far to test all of the JavaScript code and is based on Jasmine. It provides the ‘zero-configuration’ testing experience. Supports independent and non-interrupting running test without any conflict and does not require any other setup configuration and libraries. Because Jest is by Facebook it has also a very good integration when working with React.
A more detailed comparison between those testing frameworks can be found here.
Assertion Library
Now that you are able to run your tests you need a way to describe what you want to test, and how to categorize a successful outcome. To achieve this you need an assertion library, which tests if your expectation on your unit under test is correct.
Chai is the assertion library that is commonly used with mocha and similar to Node’s built-in assert. When testing with Chai you can choose between three kinds of assertion assert, expect or shouldwhich behave equally in general. An example of those different assertions styles can be found in Chais’ documentation.
Jest contains an assertion library as well which is based on the expectassertion. Expect is used similarly to the way it is handled in Chai. Besides that you will rarely call expect by itself. Instead, you will use expect along with a "matcher" function to assert something about a specified value.
The best way to understand expect is with an example. You want to test a function that returns a specific string on call. You would test it with Jest like this:
In the above example toBe is the matcher of the expect-function. The test will pass if the function really returns blue as string otherwise it will fail.
A more detailed overview of the expect-function in Jest can be found in the Jest docs.
Conclusion the stuff your tests are based on Since I’m primarily working with React I truly feel at home with Jest, because it’s easy to set up and has great support for React. Besides that you are also able to test your application very well with Mocha and Chai but this needs a little more work on your configuration of those both libraries. In general I don’t think there is much of a difference between both but I went for Jest because it’s also from Facebook like React and I think there will be better support for Jest than for Mocha whatever may come. A more detailed comparison between Jest and Mocha can be found here.
Different levels of testing
Since you now have a basic understanding of the environment our tests are running in, you may ask what to test and especially how to test. When talking about testing you will notice that there a three separate levels of testing: Unit, Integration, and End to End(E2E) tests.
The difference between those kinds of tests is mainly the amount of code that is covered by a single test. While you focus on the validity of a single component or function in a unit test. You want to ensure the manner of function between certain components/function in an integration test till you test a certain behavior of your system while imitating the actions a possible user may trigger in your system with an E2E test.
As you may expect it is a lot easier to write a unit test instead of an E2E test, and therefore it’s cheaper to write Unit tests. Also, E2E tests need more processing time to evaluate that a test is passing than a Unit test. But also and this is crucial: you will also gain a lot more confidence from E2E tests than from Unit tests. And this is literally all that we want to achieve from our tests:
Being confident everything works as expected.
Distribution of your effort to test the different levels
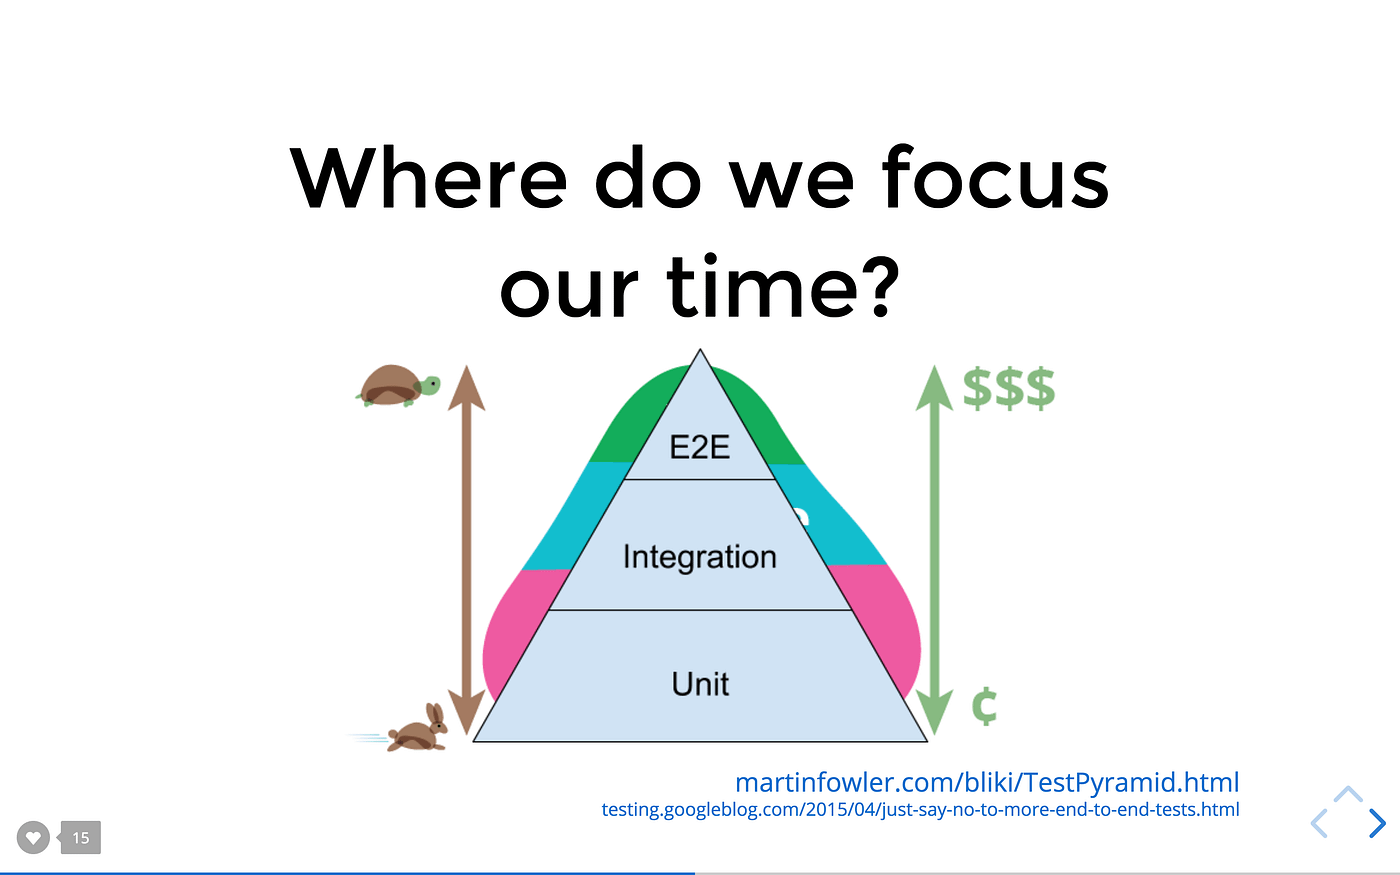
You may know the testing pyramid? Its shape defines the number of tests that should be written. As you are moving up on the pyramid the tests are getting larger and less frequent. Developers at Google suggest 70/20/10 distribution, 70% unit test, 20% integration and 10% end-to-end test.testing pyramid from Kent C. Dodds’ slides
But as I explained before, Unit tests don’t give us that much confidence that our app behaves exactly as we want it too. Kent C. Dodds proposed the Testing Trophy instead in the article “Write tests. Not too many. Mostly integration.” where he explained that you should focus on writing integration tests because they are a good balance between effort and confidence increase. Also, he introduced static code analysis as a possibility to test your code.
Static code analysis
Static code analysis is a method to debug your application without running it. In the process, the structure of your code is inspected and you will receive warnings or errors if your code contains certain discrepancies and therefore will not work as you expect it to. That’s why static code analysis is relevant for testing your code and creates the first layer of your testing experience.
With ESLint you are able to validate your code against certain patterns. For example, if you have used undefined variables or assigned a value to a variable and have not used it after the assignment. You can configure a wide range of different rulesets within your eslintrc extend existing rulesets and define your own error level if misbehavior occurs. To get an overview of how ESlint works check the demo on their site.
If you have started your React project with create-react-app ESLint is already properly defined. If you want to adjust your ESLint settings you either have to eject your application, which I would not advise you to do, or use craco by sharegate. CRACO gives you the possibility to extend the existing React configurations for Webpack, Babel and ESLint to your needs and maintain the possibility to upgrade your react-scripts aswell.
It is possible to enforce formatting rules with ESLint but you should avoid this. ESLint should be used to verify the structure of your code. To verify code style use prettier which reformats your code with ease to the defined coding style standard.
Prettier’s main task is to prettify your source code based on rules defined in a config which is applied to your codebase, so your code style is equal throughout your project. This comes in handy, especially when working with coworkers on the same codebase.
This is cool, but why is prettier relevant for static code analysis of your code, you may ask? Prettier prettifies your code by parsing and reprinting your code based on your configuration. What means that if prettier isn’t able to prettify your code you likely have made a syntax mistake, like missing brackets, in your code. If you run Prettier on save (check out this extension for prettier in vscode) you are able to identify those typos with ease. Also, a uniform code style throughout your code will give you a better understanding of what is happing in a specific file. Care about your code’s function not about its style.
Typescript is a strict synthetical superset of JavaScript which is developed by Microsoft. It provides an own compiler which compiles Typescript code to JavaScript code. Similar to Flow it contains a static type checker that validates the code during compilation time and while developing.
Almost identical function than before
will throw the following error when being compiled by typescript
Typescript can’t be added as simply as flow because your code needs to be compiled by the typescript compiler tsc. So you have to migrate your codebase to be typescript compatible to enjoy typescripts static code analysis in your codebase.
The IDE integration for Typescript feels a lot faster than with flow and the autocompletion for example in VSCode is a lot more helpful. A more detailed comparison between Flow and Typescript can be found here.
Besides Typescript, there are even more languages that provide type safety and compile to JavaScript. I will not cover those here and just drop a reference for you to dig deeper. To name a few: Reason, Elm or Dart.
Conclusion static code analysis I’m using ESLint and Prettier in almost all of my projects because once configured it just does its job of providing me a good hint what I’m doing wrong while developing.
Flow is my candidate when you already have a big codebase that has no defined types because it’s easy to just start typing with Flow.
When I start a big project from ground up I am using Typescript most of the time because of its good typing integration in many IDEs.
Unit tests
When writing unit tests, you are taking an individual component and isolate it from other components to test its behavior. You can unit test the outcome of functions or the way a component renders when passing different arguments.
An easy function to test would be the following a sum function which could be tested with this easy test
This is a totally straightforward way of testing functions. Bit in general we want to achieve confidence in our components.
Render and test React components
When it comes to React components you want to check how your component is rendered and if all props you pass to the component influence the behavior of your component as expected. That’s why we need a possibility to render our components within Jest.
Jest can use two different environments under the hood:
jsdom: which emulates a browser environment(e.g. document/window is declared and useable) in javascript
node: plain node environment especially suited for backend or functional tests without any UI-elements.
Since we want to test our React components we go with jsdom.
The example component we want to test is a simple input component which can be seen in the code sandbox.
I want to unit test this component in three different ways. One of them might be already very familiar to you.
React DOM You are already using React DOM for rendering your whole application so it is able to render certain components as well to test them.
In the example above we are creating a new div inside the document which is used as a container and render our unit under test inside it. Now that the component is rendered we can check if the components fulfill all necessary properties. For example, a prop that is rendered at a specific position.
Since this process of rendering and selecting may become a bit tedious I’d like to present you two alternatives “Enzyme” and “React Testing Library”.
Enzyme Enzyme is a JavaScript testing utility for React from AirbnbEng that makes it easier to assert, manipulate, and traverse your React Components’ output.
Besides the rendering with mount and selection of elements with findenzyme is also able to call specific functions from your components outside of the scope. Enzyme enables you to really deep dive inside the functionality of your component to check each bit that may be necessary for your application to run properly. You are able to check the state and props of your components and in general, I haven’t found an interaction you are not able to trigger or get with Enzyme. The whole spectrum of Enzymes functionality can be found in their docs.
A more detailed overview of enzyme and how to set it up within your application can be found in the following article by Dominic Fraser.Testing React with Jest and Enzyme IThis post will look at how to setup and use Jest and Enzyme to test a React application created with Create React App…medium.com
React Testing Library React Testing Library is a library that uses Dom Testing Library under the hood and is written by Kent C. Dodds as he prepared a course on the basis of Enzyme. The main reason why he wrote it was because of his opinion that you get confidence from integration tests and especially by interacting with a component like a user would do. An explanation of what React Testing Library is can be found in his article where he introduced it. The approach of testing an application like a real user would use it makes it hard to test implementation details. When testing implementation details your test will become flaky and break often because they depend too much on your implementation. You should definitely check out this library since it is recommended by React as well in their docs. A few examples on how to write tests with react testing library can be found in a specified code sandbox.
Mocking
Since you need to decouple your unit under test from other components/module dependencies to test them in isolation you need a possibility to mock them away. Jest provides two separate ways for mocking.
mocking a function
mocking a module
You can create a mock function with jest.fn() and pass an alternate implementation as an argument. This function can be used instead of the original one, for example when assigning a click handler via props. After the execution of the unit under test is finished you can inspect how it interacted with the mock function by checking the .mock property of the function which contains an array of calls the corresponding arguments and results which were returned during the execution phase.
Using mock functions becomes therefore very handy to validate your component interfaces against other components or services.
Read the full API Documentation
Read the full API Documentation
Last updated
Was this helpful?