# Redux with existing Application
This parallels the first part of this tutorial, where we’ll take a plain React app and add Redux to it one piece at a time.
Or, keep reading! The tutorial below covers everything in the video and then some.
### Should You Use Redux?
It’s especially valid, in 2019, to wonder… should you still use Redux? Is there something better out now, with Hooks or Context or some other library?
The short answer: Even with plenty of alternatives, [Redux is not dead yet](https://blog.isquaredsoftware.com/2018/03/redux-not-dead-yet/). But whether or not it makes sense for your app… well, it depends.
Super simple? Only a few bits of state in one or two places? Local component state will probably be great. You can do that with classes, [Hooks](https://daveceddia.com/intro-to-hooks/), or both.
A bit more complex, with a few “global” things that need to be shared across the app? The [Context API](https://daveceddia.com/context-api-vs-redux/) might be perfect for you.
Lots of global state, with interactions between disconnected parts of the app? Or a big app that will only get bigger over time? Give Redux a try.
You can always add Redux *later*, too. You don’t have to decide on Day 1. Start simple and add complexity when and where you need it.
#### Do You Know React Yet?
React can be used on its own without Redux. Redux is an *add-on* to React.
Even if you intend on using them both, I super strongly recommend learning pure React *without* Redux initially. Understand props, state, and one-way data flow, and learn to “think in React” before trying to learn Redux. Learning them both at the same time is a surefire recipe for confusion.
If you want a primer on React, I put together a 5-day free course that teaches all the basics:
Learn React by building a few simple apps over the next 5 days.Get Lesson 1
### The Benefits of Redux
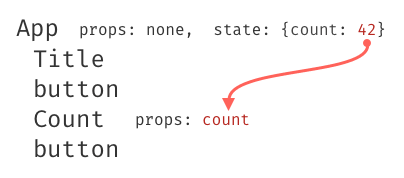
If you’ve used React for more than a few minutes, you probably know about props and one-way data flow. Data is passed *down* the component tree via props. Given a component like this:
The `count`, stored in `App`’s state, would be passed down as a prop:
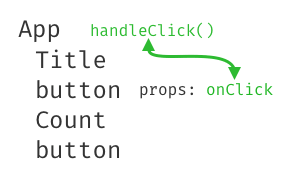
For data to come back *up* the tree, it needs to flow through a callback function, so that callback function must first be passed *down* to any components that want to call it to pass data up.
You can think of the data like *electricity*, connected by colored wires to the components that care about it. Data flows down and up through these wires, but the wires can’t be run through thin air – they have to be chained from one component to the next.
#### Passing Data Multiple Levels is a Pain
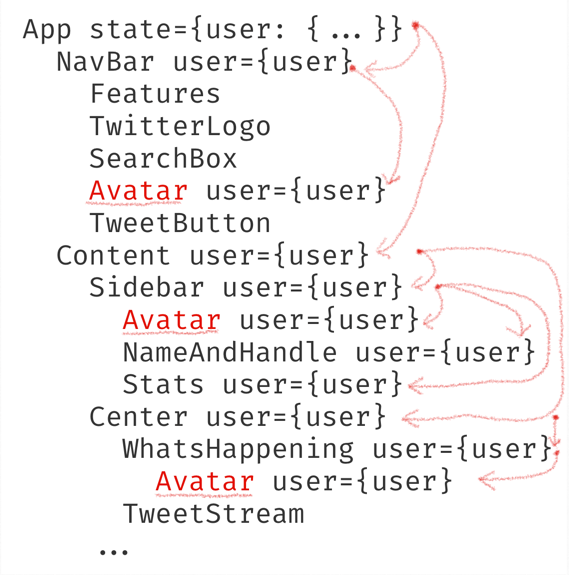
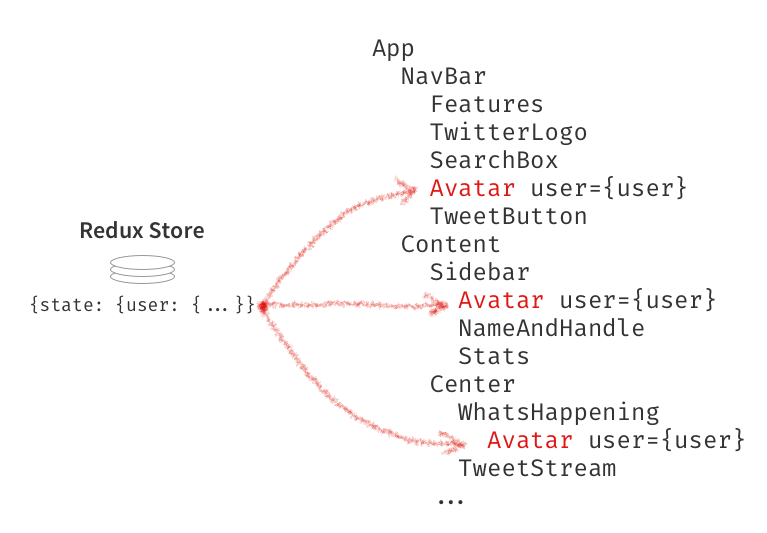
Sooner or later you run into a situation where a top-level container has some data, and a child 4+ levels down needs that data. Here’s an example from Twitter, with all the avatars highlighted:

Let’s pretend the top-level `App` component holds the `user` object in state. The `user` contains the current user’s avatar, handle, and other profile info.
In order to deliver the `user` data to all 3 `Avatar` components, the `user` needs to be woven through a bunch of intermediate components that don’t need the data.
Getting the data down there is like threading a needle through a mining expedition. Wait that doesn’t make any sense. Anyway, *it’s a pain*. Also known as “prop-drilling”.
More importantly, it’s not very good software design. Intermediate components are forced to accept and pass along props that they don’t care about. This means refactoring and reusing those components will be harder than it needs to be.
Wouldn’t it be nice if the components that didn’t need the data didn’t have to see it at all?
Redux is one way to solve this problem.
#### Passing Data Between Adjacent Components
If you have components that are siblings and need to share data, the way to do that in React is to pull that data *up* into a parent component and pass it down with props.
That can be cumbersome though. Redux can help by giving you one global “parent” where you can store the data, and then you can `connect` the sibling components to the data with React-Redux.
#### Use React-Redux to Connect Data to Any Component
Using the `connect` function that comes with `react-redux`, you can plug any component into Redux’s store and pull out the data it needs.
Redux does some other cool stuff too, like make debugging easier (Redux DevTools let you inspect every single state change), time-travel debugging (you can *roll back*state changes and see how your app looked in the past), and it can make your code more maintainable in the long run. It’ll teach you more about functional programming too.
### Built-in Redux Alternatives
If Redux seems like overkill for your situation, give these alternatives a look. They’re built right in to React.
#### Redux Alternative: The React Context API
Under the hood, React-Redux uses React’s built-in Context API to pass data around. If you want to, you can cut out the middleman and use Context directly. You’ll miss out on the nice features of Redux mentioned above, but if your app is simple and you want an easy way to pass data around, Context might be perfect.
Since you’re here, I’m gonna assume you want to learn Redux, and I won’t [compare Redux to the Context API](https://daveceddia.com/context-api-vs-redux/) or the [useContext](https://daveceddia.com/usecontext-hook/) and [useReducer](https://daveceddia.com/usereducer-hook-examples/) Hooks right here. You can learn more at those links.
If you want a deep dive on the Context API, watch my course [React Context for State Management](https://egghead.io/courses/react-context-for-state-management) at egghead.
#### Another Alternative: Use the `children` Prop
Depending on how you structure your app, you might be able to pass data to child components more directly using a combination of the `children` prop and other props as “slots”. You can effectively skip a few levels in the hierarchy if you arrange it right.
I have an article about this [“slots” pattern and how to arrange your component tree](https://daveceddia.com/pluggable-slots-in-react-components/)to pass data more efficiently.
### Learn Redux, Starting With Plain React
We’re going to take an incremental approach, starting with a plain React app with component state, adding parts of Redux piece-by-piece, and dealing with the errors along the way. Let’s call it “Error-Driven Development” :)
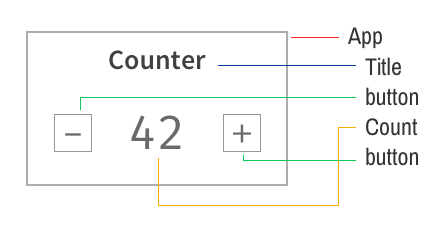
Here is a counter:
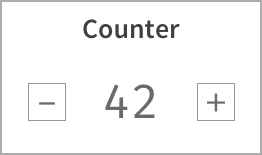
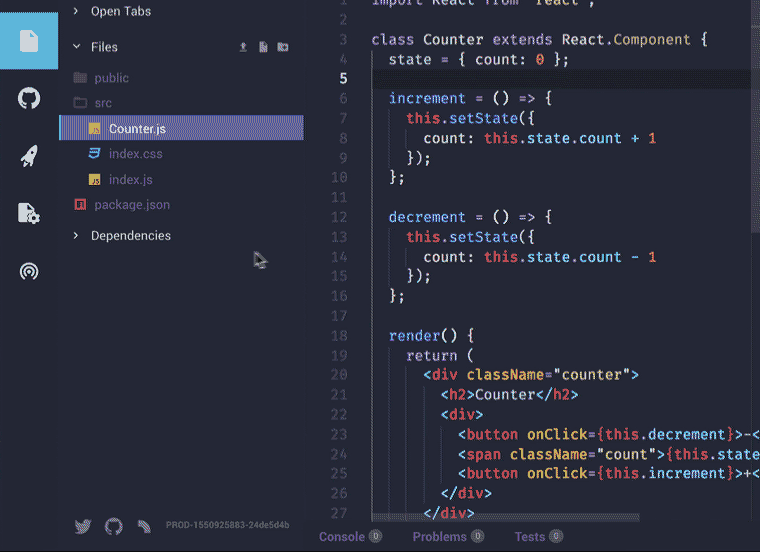
In this example, the Counter component holds the state, and the App surrounding it is a simple wrapper.Counter.js
```
import React from 'react';
class Counter extends React.Component {
state = { count: 0 }
increment = () => {
this.setState({
count: this.state.count + 1
});
}
decrement = () => {
this.setState({
count: this.state.count - 1
});
}
render() {
return (
Counter
{this.state.count}
)
}
}
export default Counter;
```
As a quick review, here’s how this works:
* The `count` state is stored in the `Counter` component
* When the user clicks “+”, the button’s `onClick` handler is called, which calls the `increment` function.
* The `increment` function updates the state with the new count.
* Because state was changed, React re-renders the `Counter` component (and its children), and the new counter value is displayed.
#### Follow Along!
The best way to actually learn this stuff is to try it! So here’s a CodeSandbox where you can follow along:
{% embed url="" %}
I highly recommend you keep the CodeSandbox in sync with the tutorial and actually type out the examples as you go along.
### Add Redux To The React App
In CodeSandbox, expand the Dependencies section in the left pane, and click Add Dependency.
Search for `redux`, add it, then click Add Dependency again and search for `react-redux` and add it.
In a local project, you can install them with Yarn or NPM: `npm install --save redux react-redux`.
### redux vs react-redux
`redux` gives you a store, and lets you keep state in it, and get state out, and respond when the state changes. But that’s all it does.
It’s actually `react-redux` that lets you connect pieces of the state to React components.
That’s right: `redux` knows nothing about React *at all*.
These libraries are like two peas in a pod, though. 99.999% of the time, when anyone mentions “Redux” in the context of React, they are referring to both of these libraries in tandem. So keep that in mind when you see Redux mentioned on StackOverflow, or Reddit, or elsewhere.
The `redux` library can be used outside of a React app too. It’ll work with Vue, Angular, and even backend Node/Express apps.
### Redux Has One Global Store
We’re going to start by looking at just Redux by itself, and just one piece of it: the **store**.
We’ve talked about how Redux keeps the **state** of your app in a single **store**. And how you can extract parts of that state and plug it into your components as props.
You’ll often see the words “state” and “store” used interchangeably. Technically, the **state** is the data, and the **store** is where it’s kept.
So: as step 1 of our refactoring from plain React to Redux, we need to create a store to hold the state.
### Create the Redux Store
Redux comes with a handy function that creates stores, and it’s called `createStore`. Logical enough, eh?
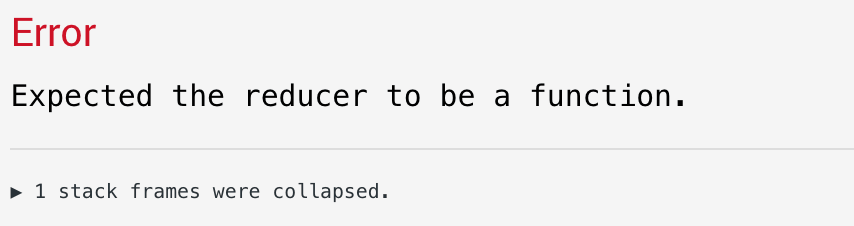
In `index.js`, let’s make a store. Import `createStore` and call it like so : index.js
```
import { createStore } from 'redux';
const store = createStore();
const App = () => (
);
```
This should fail with the error “Expected the reducer to be a function.”
#### The Store Needs a Reducer
So, here’s the thing about Redux: it’s not very smart.
You might expect that by creating a store, it would give your state a nice default value. Maybe an empty object, perhaps?
But no. No convention-over-configuration here.
Redux makes *zero* assumptions about the shape of your state. It could be an object, or a number, or a string, or whatever you need. It’s up to you!
We have to provide a function that will return the state. That function is called a **reducer** (we’ll see why in a minute). So let’s make a really simple one, pass it into `createStore`, and see what happens:index.js
```
function reducer(state, action) {
console.log('reducer', state, action);
return state;
}
const store = createStore(reducer);
```
After you make this change, open up the console (in CodeSandbox, click the Console button at the bottom).
You should see a message logged there, something like this:

(the letters and numbers after INIT are randomized by Redux)
Notice how Redux called your reducer at the time you created the store. (To prove it: put a `console.log` immediately after the call to `createStore` and notice how it prints out after the reducer)
Also notice how Redux passed a `state` of `undefined`, and the action was an object with a `type` property.
We’ll talk more about actions in a minute. For now, let’s go over the *reducer*.
### What Is a Redux Reducer?
The term “reducer” might seem a bit scary and foreign, but after this section I think you’ll come to agree that it is, as the saying goes, “just a function.”
Have you ever used the `reduce` function on an array?
Here’s how it works: You pass it a function, and it calls your function once for each element of the array, similar to how `map` works – you’re probably familiar with `map` from rendering lists of things in React.
Your function gets called with 2 arguments: the last iteration’s result, and the current array element. It combines the current item with the previous “total” result and returns the new total.
This will make more sense with an example:
```
var letters = ['r', 'e', 'd', 'u', 'x'];
// `reduce` takes 2 arguments:
// - a function to do the reducing (you might say, a "reducer")
// - an initial value for accumulatedResult
var word = letters.reduce(
function(accumulatedResult, arrayItem) {
return accumulatedResult + arrayItem;
},
''); // <-- notice this empty string argument: it's the initial value
console.log(word) // => "redux"
```
The function you pass in to `reduce` could rightfully be called a “reducer”… because it *reduces* a whole array of items down to a single result.
Redux is *basically* a fancy version of Array’s `reduce`. Earlier, you saw how Redux reducers have this signature:
```
(state, action) => newState
```
Meaning: it takes the current `state`, and an `action`, and returns the `newState`. Looks a lot like the signature of an `Array.reduce` reducer!
```
(accumulatedValue, nextItem) => nextAccumulatedValue
```
Redux reducers work just like the function you pass to Array.reduce! :) The thing they reduce is actions. They **reduce a set of actions (over time) into a single state**. The difference is that with Array’s reduce it happens all at once, and with Redux, it happens over the lifetime of your running app.
If you’re still super unsure, check out my guide to [how Redux reducers work](https://daveceddia.com/what-is-a-reducer/). Otherwise, let’s forge ahead.
### Give the Reducer an Initial State
Remember that the reducer’s job is to take the current `state` and an `action` and return the new state.
It has another job, too: It should return the **initial state** the first time it’s called. This is sort of like “bootstrapping” your app. It’s gotta start somewhere, right?
The idiomatic way to do that is to define an `initialState` variable and use the ES6 default argument syntax to assign it to `state`.
Since we’re gonna be moving our `Counter` state into Redux, let’s set up its initial state right now. Inside the `Counter` component our state is represented as an object with a `count`, so we’ll mirror that same shape here.index.js
```
const initialState = {
count: 0
};
function reducer(state = initialState, action) {
console.log('reducer', state, action);
return state;
}
```
If you look at the console again, you’ll see it printed `{count: 0}` as the value for `state`. That’s what we want.
So that brings us to an important rule about reducers.
***Important Rule of Reducers #1**: Never return undefined from a reducer.*
You always want your state to be defined. A defined state is a happy state. An *un*defined state is *un*happy (and will likely break your app).
### Dispatch Actions to Change the State
Yep, two new terms at once: we’re gonna “dispatch” some “actions.”
#### What is a Redux Action?
An **action** is Redux-speak for a plain object with a property called `type`. That’s pretty much it. Following those 2 rules, this is an action:
```
{
type: "add an item",
item: "Apple"
}
```
This is also an action:
```
{
type: 7008
}
```
Here’s another one:
```
{
type: "INCREMENT"
}
```
Actions are very free-form things. As long as it’s an object with a `type` it’s fair game.
In order to keep things sane and maintainable, we Redux users usually give our actions types that are **plain strings**, and often uppercased, to signify that they’re meant to be constant values.
An action object describes a change you want to make (like “please increment the counter”) or an event that happenend (like “the request to the server failed with this error”).
Actions, despite their active-sounding name, are boring, inert objects. They don’t really *do* anything. Not on their own, anyway.
In order to make an action DO something, you need to **dispatch** it.
### How Redux Dispatch Works
The store we created earlier has a built-in function called `dispatch`. Call it with an action, and Redux will call your reducer with that action (and then replace the state with whatever your reducer returned).
Let’s try it out with our store.index.js
```
const store = createStore(reducer);
store.dispatch({ type: "INCREMENT" });
store.dispatch({ type: "INCREMENT" });
store.dispatch({ type: "DECREMENT" });
store.dispatch({ type: "RESET" });
```
Add those dispatch calls to your CodeSandbox and check the console.
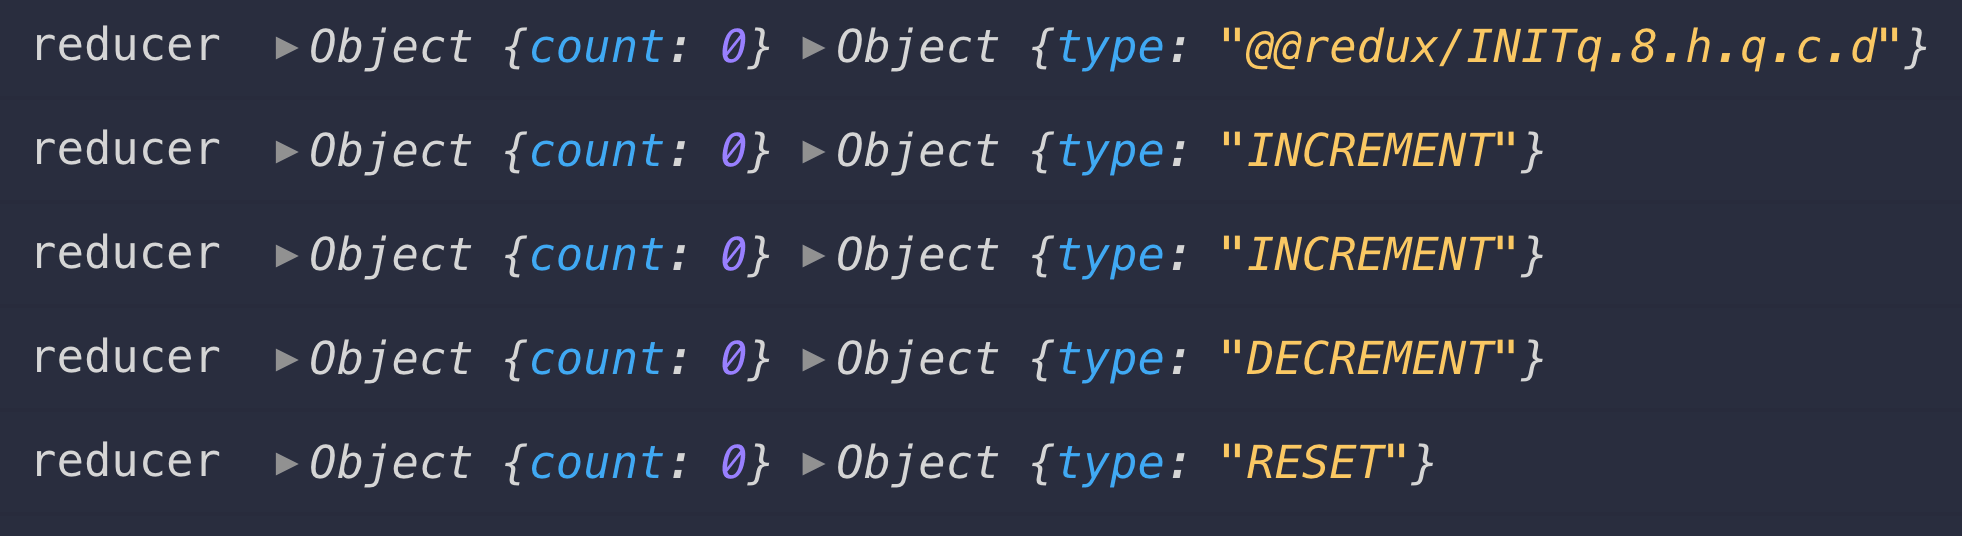
Every call to `dispatch` results in a call to your reducer!
Also notice how the state is the same every time? `{count: 0}` never changes.
That’s because our reducer is not *acting on* those actions. That’s an easy fix though. Let’s do that now.
### Handle Actions in the Redux Reducer
To make actions actually do something, we need to write some code in the reducer that will inspect the `type` of each action and update the state accordingly.
There are a few ways to do this.
You could make a fancy object where you look up a handler function by the action’s type…
Or you could write a bunch of if/else statements…
```
if(action.type === "INCREMENT") {
...
} else if(action.type === "RESET") {
...
}
```
Or you could use a simple `switch` statement, which is what I’ll show below because it’s straightforward, and a very common way to do it.
Some people hate the `switch` though. If that’s you – please feel free to write your reducers however you want :)
Here’s how we’ll handle the actions : index.js
```
function reducer(state = initialState, action) {
console.log('reducer', state, action);
switch(action.type) {
case 'INCREMENT':
return {
count: state.count + 1
};
case 'DECREMENT':
return {
count: state.count - 1
};
case 'RESET':
return {
count: 0
};
default:
return state;
}
}
```
Try this out and take a look at the console.
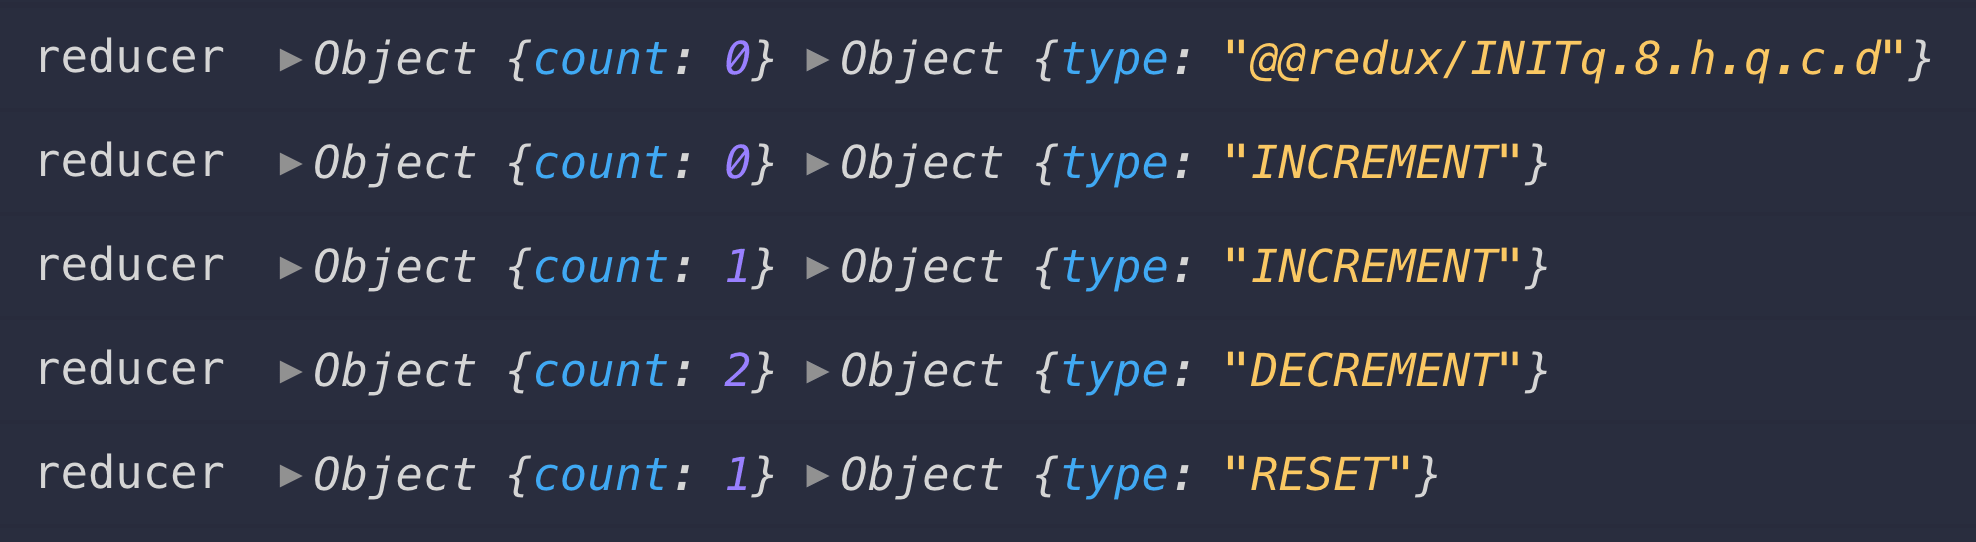
Hey look at that! The `count` is changing!
We’re about ready to hook this up to React, but let’s talk about this reducer code for a second.
### How to Keep Your Reducers Pure
Another rule about reducers is that they must be **pure functions**. This means that they can’t modify their arguments, and they can’t have side effects.
***Reducer Rule #2: Reducers must be pure functions.***
A “side effect” is any change to something outside the scope of the function. Don’t change variables outside the scope of the function, don’t call other functions that change things (like `fetch`, which affects the network and other systems), don’t dispatch actions, and so on.
Technically `console.log` is a side effect, but we’ll allow that one.
The most important thing is this: **don’t modify the `state` argument**.
This means you can’t do `state.count = 0` or `state.items.push(newItem)` or `state.count++`, or any other kind of mutation – not to `state` itself, and not to any of the sub-properties of `state`.
Think of it like a game where the only thing you can do is `return { ... }`. It’s a fun game. Maddening at first. But you’ll get better at it with practice.
### All These Rules…
Redux is built on the idea of immutability, because mutating global state is the road to ruin.
Have you ever tried keeping your state in a global object? It works great at first. Nice and easy. Everything can access the state because it’s always available, and making changes is simple.
And then the state starts changing in unpredictable ways and it becomes impossible to find the code that’s changing it.
Redux avoids these problems with some simple rules.
* State is read-only, and actions are the only way to modify it.
* Changes happen one way, and one way only: dispatch(action) -> reducer -> new state.
* The reducer function must be “pure” – it cannot modify its arguments, and it can’t have side effects.
### How to Use Redux with React
At this point we have a lovely little `store` with a `reducer` that knows how to update the `state` when it receives an `action`.
Now it’s time to hook up Redux to React.
To do that, the `react-redux` library comes with 2 things: a component called `Provider`, and a function called `connect`.
By wrapping the entire app with the `Provider` component, *every component* in the app tree will be able to access the Redux store if it wants to.
In `index.js`, import the `Provider` and wrap the contents of `App` with it. Pass the `store` as a prop.index.js
```
import { Provider } from 'react-redux';
const App = () => (
);
```
After this, `Counter`, and children of `Counter`, and children of their children, and so on – all of them can now access the Redux store.
But not automatically. We’ll need to use the `connect` function on our components to access the store.
#### How the React-Redux Provider Works
This `Provider` thing might seem like total magic. It is a little bit; it actually uses React’s [Context feature](https://daveceddia.com/context-api-vs-redux/) under the hood.
Context is like a secret passageway connected to every component, and using `connect` opens the door to the passageway.
Imagine pouring syrup on a pile of pancakes, and how it manages to make its way into ALL the pancakes even though you only poured it on the top one. `Provider`does that for Redux.
### Prepare the Counter Component for Redux
Right now the Counter has local state. We’re going to rip that out, in preparation to get the `count` as a prop from Redux.
Remove the state initialzation at the top and the `setState` calls inside `increment` and `decrement`. Then, replace `this.state.count` with `this.props.count`.Counter.js
```
class Counter extends React.Component {
// state = { count: 0 }; // remove this
increment = () =>
};
decrement = () => {
};
render() {
return (
Counter
{
this.props.count
}
);
}
}
```
This will leave `increment` and `decrement` empty. We’ll fill them in again soon.
You’ll also notice the count has disappeared – which it should, because nothing is passing a `count` prop to `Counter` yet.
## Connect the Component to Redux
To get the `count` out of Redux, we first need to import the `connect` function at the top of Counter.js
```
import { connect } from 'react-redux';
```
Then we need to “connect” the Counter component to Redux at the bottom : Counter.js
```
// Add this function:
function mapStateToProps(state) {
return {
count: state.count
};
}
// Then replace this:
// export default Counter;
// With this:
export default connect(mapStateToProps)(Counter);
```
Previously we were exporting the component itself. Now we’re wrapping it with this `connect` function call, so we’re exporting the *connected* Counter. As far as the rest of your app is concerned, this looks like a regular component.
And the count should reappear! Except it’s frozen until we reimplement increment/decrement.
### How to Use React Redux `connect`
You might notice the call looks little… weird. Why `connect(mapStateToProps)(Counter)` and not `connect(mapStateToProps, Counter)` or `connect(Counter, mapStateToProps)`? What’s that doing?
It’s written this way because `connect` is a ***higher-order function***, which is a fancy way of saying it returns a function when you call it. And then calling *that* function with a component returns a new (wrapped) component.
Another name for this is a [*higher-order component*](https://daveceddia.com/extract-state-with-higher-order-components/) (aka “HOC”). HOCs have gotten some bad press in the past, but it’s still quite a useful pattern, and `connect` is a good example of a useful one.
What `connect` does is hook into Redux, pull out the entire state, and pass it through the `mapStateToProps` function that you provide. This needs to be a custom function because only *you* know the “shape” of the state you’ve stored in Redux.
### How mapStateToProps Works
`connect` passes the entire state to your `mapStateToProps` function as if to say, “Hey, tell me what you need out of this jumbled mess.”
The object you return from `mapStateToProps` gets fed into your component as props. The example above will pass `state.count` as the value of the `count`prop: the keys in the object become prop names, and their corresponding values become the props’ values. So you see, this function literally *defines a mapping from state into props*.
By the way – the name `mapStateToProps` is conventional, but it’s not special in any way. You can shorten it to `mapState` or call it whatever you want. As long as it takes the `state` object and returns an object full of props, you’re good.
### Why not pass the whole state?
In the example above, our state is *already* in the right shape… and it seems like maybe `mapDispatchToProps` is unnecessary. If it essentially copies the argument (state) into an object that is identical to the state, what good is it?
In really small examples that might be all it does, but usually you’ll be picking out pieces of data the component needs from a larger collection of state.
And also, without the `mapStateToProps` function, `connect` won’t pass in any state data at all.
You *could* pass in all of the state, and let the component sort it out. That’s not a great habit to get into though, because the component will need to know the shape of the Redux state to pick out what it needs, and it’ll be harder to change that shape later, if you need.
### Dispatch Redux Actions from a React Component
Now that our Counter is `connect`ed, we’ve got the `count` value. Now how can we dispatch actions to change the count?
Well, `connect` has your back: in addition to passing in the (mapped) state, it *also*passes in the `dispatch` function from the store!
To dispatch an action from inside the Counter, we can call `this.props.dispatch`with an action.
Our reducer is already set up to handle the `INCREMENT` and `DECREMENT` actions, so let’s dispatch those from increment/decrement
```
increment = () => {
this.props.dispatch({ type: "INCREMENT" });
};
decrement = () => {
this.props.dispatch({ type: "DECREMENT" });
};
```
And now we’re done. The buttons should work again.
#### Try this! Add a Reset Button
Here’s a little exercise to try: add a “Reset” button to the counter that dispatches the “RESET” action when clicked.
The reducer is already set up to handle this action, so you should only need to modify Counter.js.
### Action Constants
In most Redux apps, you’ll see **action constants** used in place of plain strings. It’s an extra level of abstraction that can save you some time in the long run.
Action constants help avoid typos, and typos in action names can be a huge pain: no errors, no visible sign that anything is broken, and your actions don’t appear to be doing anything? Could be a typo.
Action constants are easy to write: store your action strings in variables.
A good place to put these is in an `actions.js` file (when your app is small, anyway)
```
export const INCREMENT = "INCREMENT";
export const DECREMENT = "DECREMENT";
```
Then you can import the action names, and use those instead of writing the strings
```
import React from "react";
import { INCREMENT, DECREMENT } from './actions';
class Counter extends React.Component {
state = { count: 0 };
increment = () => {
this.props.dispatch({ type: INCREMENT });
};
decrement = () => {
this.props.dispatch({ type: DECREMENT });
};
render() {
...
}
}
```
### What is a Redux Action Creator?
Up til now we’ve been writing out action objects manually. Like heathens.
What if you had a *function* that would write them for you? No more mis-written actions!
I can tell you think this is crazy. How hard is it to write `{ type: INCREMENT }`without messing up?
As your app grows larger, and you have more than 2 actions, and those actions start to get more complex – passing around more data than just a `type` – action creators can be helpful to have.
Like action constants, they’re not a *requirement* though. This is another layer of abstraction and if you don’t want to bother with it in your app, that’s fine.
I’ll explain what they are anyway, though. You can decide if you want to use them sometimes/always/never.
An **action creator** in Redux terms is a fancy term for function that returns an action object. That’s all it is :)
Here are two of them, returning familiar actions. These go nicely in `actions.js`alongside the action constants, by the way.actions.js
```
export const INCREMENT = "INCREMENT";
export const DECREMENT = "DECREMENT";
export function increment() {
return { type: INCREMENT };
}
export const decrement = () => ({ type: DECREMENT });
```
I wrote them two different ways – as a `function` and as an arrow – to show that it doesn’t matter how you write them. Pick your fave and go with it.
You’ll notice that the function names are camelCase (well, they would be ifTheyWereLonger) while the action constants are `UPPER_CASE_WITH_UNDERSCORES`. That, too, is just a convention. Helps you know if you’re looking at an action creator function or an action constant. But feel free to name yours how you like. Redux doesn’t care.
Now… w hat do you do with an action creator? Import it and dispatch it, of course! Counter.js
```
import React from "react";
import { increment, decrement } from './actions';
class Counter extends React.Component {
state = { count: 0 };
increment = () => {
this.props.dispatch(increment()); // << use it here
};
decrement = () => {
this.props.dispatch(decrement());
};
render() {
}
}
```
The key thing is to remember to **call the action creator()**!
Don’t `dispatch(increment)` 🚫
Do `dispatch(increment())` ✅
Remember that an action creator is a plain old function. Dispatch wants an action *object*, not a function.
Also: you will almost definitely mess this up and be very confused. At least once, probably many times. That’s normal. I *still* forget sometimes.
### How to Use React Redux mapDispatchToProps
Now that you know what an action creator is, we can talk about *one more* level of abstraction. (I know. I KNOW. It’s optional though.)
You know how `connect` passes in a `dispatch` function? And you know how you get really tired of typing `this.props.dispatch` all the time and it bothers you how messy that looks? (go with me here)
By writing a `mapDispatchToProps` object (or function! but usually object) and passing it to `connect` when you wrap your component, you’ll receive those action creators as *callable props*. Here’s what I mean:Counter.js
```
import React from 'react';
import { connect } from 'react-redux';
import { increment, decrement } from './actions';
class Counter extends React.Component {
increment = () => {
// We can call the `increment` prop,
// and it will dispatch the action:
this.props.increment();
}
decrement = () => {
this.props.decrement();
}
render() {
// ...
}
}
function mapStateToProps(state) {
return {
count: state.count
};
}
// in this object, keys become prop names,
// and values should be action creator functions.
// They get bound to `dispatch`.
const mapDispatchToProps = {
increment,
decrement
};
export default connect(mapStateToProps, mapDispatchToProps)(Counter);
```
This is nice because it saves you from having to call `dispatch` manually.
You can also write `mapDispatch` as a function, but the object covers probably 95% of what you need. You can read more about the [functional mapDispatch form and why you probably don’t need it](https://daveceddia.com/redux-mapdispatchtoprops-object-form/).
### How to Fetch Data with Redux Thunk (Middleware)
Since reducers are supposed to be “pure,” we can’t do any API calls or dispatch actions from inside a reducer.
We also can’t do that stuff inside a plain action creator!
But what if we could make an action creator *return* a function that could do our work? Something like this:
```
function getUser() {
return function() {
return fetch('/current_user');
};
}
```
Out of the box, Redux doesn’t support actions like this. Stock Redux only accepts *plain objects* as actions.
This is where redux-thunk comes in. It is a **middleware**, basically a plugin for Redux, that enables Redux to deal with actions like `getUser()`, above.
You can dispatch these “thunk actions” like any other action creator: `dispatch(getUser())`.
#### What’s a “thunk”?
A “thunk” is a (uncommon) name for a *function* that’s returned by another function.
In Redux terms, it’s an action creator that returns a function instead of a plain action object, like this:
```
function doStuff() {
return function(dispatch, getState) {
// dispatch actions here
// or fetch data
// or whatever
}
}
```
If you wanna get technical, the function being returned is the “thunk”, and the one that returns it is the “action creator”. Usually I call the whole bundle a “thunk action.”
The function you return from your action creator will be passed 2 arguments: the `dispatch` function, and `getState`.
Most of the time you’ll only need `dispatch`, but sometimes you want to do something conditionally, based on some value in the Redux state. In that case, call `getState()` and you’ll have the entire state to read as needed.
### How to Setup Redux Thunk
To install redux-thunk with NPM or Yarn, run `npm install --save redux-thunk`.
Then, in index.js (or wherever you create your store), import `redux-thunk` and apply it to the store with Redux’s `applyMiddleware` function:
```
import thunk from 'redux-thunk';
import { createStore, applyMiddleware } from 'redux';
function reducer(state, action) {
// ...
}
const store = createStore(
reducer,
applyMiddleware(thunk)
);
```
Just make sure to wrap `thunk` in the `applyMiddlware` call or it won’t work. Don’t pass `thunk` directly.
### An Example of Fetching Data with Redux
Let’s imagine you want to display a list of products. You’ve got a backend API that answers to `GET /products`, so you create this thunk action to do the fetching: productActions.js
```
export function fetchProducts() {
return dispatch => {
dispatch(fetchProductsBegin());
return fetch("/products")
.then(res => res.json())
.then(json => {
dispatch(fetchProductsSuccess(json.products));
return json.products;
})
.catch(error => dispatch(fetchProductsFailure(error)));
};
}
```
The `fetch("/products")` part is what’s actually fetching the data. Then we have a few calls to `dispatch` before and after.
### Dispatch the Action to Fetch the Data
To kick off the call and actually fetch the data, we need to dispatch the `fetchProducts` action.
Where should you do it?
If a particular component needs the data, the best place to kick off the fetch is usually right *after* that component mounts, in its `componentDidMount` lifecycle method.
Or, if you’re using Hooks, inside the useEffect hook is a good spot.
Sometimes you’re fetching truly *global* data that the whole app needs – think “user profile” or “i18n translations”. In those cases, dispatch the action right after you create the store, with `store.dispatch`, rather than waiting for a component to mount.
#### How to Name Your Redux Actions
Redux actions that fetch data usually come in triplets: BEGIN, SUCCESS, FAILURE. This isn’t a requirement, it’s only a convention.
This BEGIN/SUCCESS/FAILURE pattern is nice because it gives you hooks to keep track of what’s happening – say, by setting a “loading” flag `true` in response to the BEGIN action, and then `false` after SUCCESS or FAILURE.
And, as with pretty much everything else in Redux… this, too, is a convention you can feel free to ignore if you don’t you need it.
*Before* you start the API call, you dispatch the BEGIN action.
Then *after* the call succeeds, you dispatch SUCCESS with the data. If it failed instead, you dispatch FAILURE with the error.
Sometimes the last one is called ERROR instead. It doesn’t really matter what you call it, as long as you’re consistent about it.
**Careful**: Dispatching an ERROR action and handling a FAILURE will lead to no end of hair pulling as you trace through your code, realizing the action is dispatching correctly but the data is never updating. Learn from my mistakes :)
Here’s what those actions look like, along with action creators for them:productActions.js
```
export const FETCH_PRODUCTS_BEGIN = 'FETCH_PRODUCTS_BEGIN';
export const FETCH_PRODUCTS_SUCCESS = 'FETCH_PRODUCTS_SUCCESS';
export const FETCH_PRODUCTS_FAILURE = 'FETCH_PRODUCTS_FAILURE';
export const fetchProductsBegin = () => ({
type: FETCH_PRODUCTS_BEGIN
});
export const fetchProductsSuccess = products => ({
type: FETCH_PRODUCTS_SUCCESS,
payload: { products }
});
export const fetchProductsFailure = error => ({
type: FETCH_PRODUCTS_FAILURE,
payload: { error }
});
```
We’ll write a reducer to save the products into the Redux store when it receives the `FETCH_PRODUCTS_SUCCESS` action. It’ll also set a `loading` flag to true when the fetch begins, and false when it finishes or fails.productReducer.js
```
import {
FETCH_PRODUCTS_BEGIN,
FETCH_PRODUCTS_SUCCESS,
FETCH_PRODUCTS_FAILURE
} from './productActions';
const initialState = {
items: [],
loading: false,
error: null
};
export default function productReducer(state = initialState, action) {
switch(action.type) {
case FETCH_PRODUCTS_BEGIN:
// Mark the state as "loading" so we can show a spinner or something
// Also, reset any errors. We're starting fresh.
return {
...state,
loading: true,
error: null
};
case FETCH_PRODUCTS_SUCCESS:
// All done: set loading "false".
// Also, replace the items with the ones from the server
return {
...state,
loading: false,
items: action.payload.products
};
case FETCH_PRODUCTS_FAILURE:
// The request failed. It's done. So set loading to "false".
// Save the error, so we can display it somewhere.
// Since it failed, we don't have items to display anymore, so set `items` empty.
//
// This is all up to you and your app though:
// maybe you want to keep the items around!
// Do whatever seems right for your use case.
return {
...state,
loading: false,
error: action.payload.error,
items: []
};
default:
// ALWAYS have a default case in a reducer
return state;
}
}
```
Finally, we need to pass the products into a `ProductList` component that will display them, and also be responsible for kicking off the data fetching.ProductList.js
```
import React from "react";
import { connect } from "react-redux";
import { fetchProducts } from "/productActions";
class ProductList extends React.Component {
componentDidMount() {
this.props.dispatch(fetchProducts());
}
render() {
const { error, loading, products } = this.props;
if (error) {
return
Error! {error.message}
;
}
if (loading) {
return
Loading...
;
}
return (
{products.map(product =>
{product.name}
)}
);
}
}
const mapStateToProps = state => ({
products: state.products.items,
loading: state.products.loading,
error: state.products.error
});
export default connect(mapStateToProps)(ProductList);
```
I’m referring to the data with `state.products.` instead of just `state.` because I’m making the assumption that you’ll probably have more than one reducer, each handling its own slice of state. To make this work, we can write a `rootReducer.js` file that pulls them all together:rootReducer.js
```
import { combineReducers } from "redux";
import products from "./productReducer";
export default combineReducers({
products
});
```
Then, when we create our store, we can pass this “root” reducer:index.js
```
import rootReducer from './rootReducer';
// ...
const store = createStore(rootReducer);
```
### Error Handling in Redux
The error handling here is pretty light, but the basic structure will be the same for most actions that make API calls. The general idea is:
1. Dispatch a FAILURE action when the call fails
2. Handle that FAILURE action in the reducer by setting some kind of flag and/or saving the error message.
3. Pass the error flag and the message (if you have one) into components that need to handle errors, and conditionally render the error however you see fit.
#### Can You Avoid the Double Render?
This is a really common concern. And yes, it *will* render more than once.
It will render in an empty state, then re-render in a loading state, and then re-render *again* with products to show. The horror! 3 renders! (you could get it down to 2 if you skip straight to the “loading” state)
You may be worried about unnecessary renders because of performance, but don’t be: single renders are very fast. If you’re working on an app where they are slow enough to notice, do some profiling and figure out why that’s the case.
Think of it this way: the app needs to show *something* when there are no products, or when they’re loading, or when there’s an error. You probably don’t want to just show a blank screen until the data is ready. This gives you an opportunity to make that user experience shine.